Showing posts with label primary elements. Show all posts

Saturday, July 9, 2022

Making My Own Shimmering Watercolour Paints & Why I am turning into a Smurf!


Watch How I Made Interference Watercolour


Summer is flying by at a rapid pace. Instead of painting with Watercolours like I was planning on doing, I seem to be procrastinating by stocking up watercolour supplies, creating new shimmer paints, organizing and reorganizing my paint palettes. I love being able to have moveable colour pans. And
our poppies

Don't ask me how many brushes, palettes and watercolour pads I have purchased. If Amazon only had a frequent shopper reward system. 

Make Your Own Paint

This is about how I learned to make my own shimmer paints using Interference and shimmery/mica type pigments. As well, you will also see my transformation to a Smurf!

Of course there are many tutorials on creating watercolour paints on your own. Google them. I just want to share how I did it with as little effort as possible, without mulling. How do we learn if we don't experiment and learn from others. 

The cool thing is, we can use pigments to create acrylic and oil and tempura etc. paints also. The key is all pigments need to be combined with the appropriate binder. If you want to make watercolour as in my case, you need Gum Arabic solution (more on that later). For Acrylic you can use and Acrylic gel medium, I would even mic pigment powder with anything like polyurethane, varnish, clear glues. Basically anything that can harden, cure or dry. Using pigments in resins are also used to paint with resin "paint." Then for oil paint, you can use oil binders (not an expert on oil), I think Linseed oil is part of that paint? But not sure.

I definitely use purchased paint whether watercolour or acrylic. It's just after watching others make paint and especially shimmer paints, I thought I can try that. Since I have a collection of mica type pigments, I was excited to not need to by shimmer/colour shifting paints.

Materials Used

πŸ’—Shimmery/Mica Interference (mermaid) And Colour Shifting Pigment Powders

Binder ingredients

πŸ’—I also used a ready made Gum Arabic binder

πŸ’—Gum Arabic (I used it in powder form)

πŸ’—Vegetable Glycerin

πŸ’—Honey (tried some but decided it made the binder too sticky)

πŸ’—Clove oil (as a preservative for the binder that must be refrigerated)

Tools


πŸ’—
A glass or ceramic tile

πŸ’—palette knife

πŸ’—a glass jar with lid

πŸ’—Paper towels

πŸ’—spray bottle of water

πŸ’—test paper in white and dark or black for testing paint

πŸ’—paintbrush

πŸ’—water jar for washing brushes

Watch the video to see how I started mixing pigment powder with the binder. Unfortunately, the camera overheated because it was too hot outside so I didn't complete the mixing process. Adding the binder in a bit at a time, waiting for the mixture to be like a watered down toothpaste sort of. Or kind of like Cheez whiz or sour cream, a combination between Greek and regular yoghurt texture. You can tell I like food by all the food references.πŸ˜‹ And then just make sure I was mixing and pressing down with the pallet knife as much as possible. Even if you think it's just mixed, there can still be unsaturated pigment particles. The more you mix, press, smoosh the powder with the binder, the better the paint will dry and be pretty darn good to use on paper.

Here are the half pan size paint pans

Once I am satisfied at the consistency of the pigment mixture I'd test out the mixture with a wet paintbrush on paper. With interference colours using black paper is the only thing that really works because you can't see the colour otherwise. I just like to make sure it's combined enough to create somewhat of a smooth paint. It's amazing how quickly the Arabic gum binder dries or cure's. Then I scrape it up with the pallet knife and drop it into a half or full watercolour paint pans.

Then let the paint basically dry out or harden. It's important to keep the lid off to let it harden. There's going to be mistakes made, and some paints may end up too wet and never really harden. You can still use them. But that's how we learn lessons. If you want to do the exact correct way to make watercolour paint using real authentic pigments and even the shimmer colour shifting pigment powders that I've used, then definitely check out the video about mowing below to see how it's done. And definitely check out lots of videos, to learn more about this process.

Please note: I do not use the proper technique for making watercolour paint simply because physically, I cannot use a device like a muller. Due to my neuromuscular disability, my hands and arms are not strong enough to even lift that thing. I just wanted to show you how it does work to some degree if you're just using shimmery powders and a pallet knife. Some pigments work better than others. Definer the pigment powders the better it seems to go..

Mulling

glass muller

How to make paints out of pigment powders the truly correct way, involves something called mulling, using a Muller. Here is what mulling watercolour paint looks like with a video on YouTube Showing how to do it correctly here at PearFleur The muller is a weighty piece of glass.


Binders are needed for all types of paint. In watercolour Gum Arabic is used in combination with water, glycerine and some use honey instead or with glycerine. I learned after to heat up the water (some recipes said to) When I did, it smelled badly and eventually it got better. Just look for recipes Watercolour Binder or I also purchased gum Arabic all ready to be used as a watercolour binder. 

You enjoy this and try it out.

Thursday, September 12, 2019

Nail Art Powders to Transform Our Kitchen Table Top into a GALAXY! By Hand Painting -Part 1

This was GRAND FINALE number 1- As of today September 12, 2019 - I am trying to complete the FINAL Grand Finale!
Hi guys! So Sorry, it has been a while since making a new video that is art related. I have been creating all summer and of course this table top has taken up the last half of it!
Hope you have been creating and enjoying the final remains of summer. I would love to hear about what you have been learning or working on.

Finally, I was able to edit and publish part one about the transforming of our kitchen table. I started a month ago and as of today, September 12,I am still trying to perfect it! But out of interest to document and to help others go to sleep, I am posting the footage we took documenting the beginning process. There is a grand finale moment but, I took up the paint brush a week or two later and have worked daily ever since! It didn't hurt that I received a pile of new nail art powders and flakes that make great stars and cosmic effects!
Watch the first part Below!

I apologize that part one has some very amatuer videography, but we are amateurs any way. The hope
is to demonstrate how you can take a plain piece of furniture or even a counter top or canvas, piece of wood, etc. and turn it into a work of art!!

Details on materials used Here is a list of the materials I have used to transform our table top.
You can use paint but I wanted to create layers and special sparkling effects.
After all that is what galaxies are, lots of sparkling stars and nebulas and such!
πŸ’•Primary Elements - click here to see a previous article about them
πŸ’•Nail Art Powders - Mostly Born Pretty brand including chameleon, colour changing flakes, mermaid and chameleon
πŸ’•Mica Powders - click here to see a previous article on my Pear Ex swatches
πŸ’•A few sizes of soft paint brushes none larger than about 3/4 inches wide.
πŸ’•A small fan brush
πŸ’•Holographic glitters - I used a lot! including microfine ones from Born Pretty
πŸ’•Course sand paper - I lightly sanded down high points when glitter felt too sharp.
Primary Elements

πŸ’•Polycrylic water based Gloss finish - basically polyurethane- I used a total of about 3 quarts/litres of polyurethane including some Acrylic varnish/medium
πŸ’•I did try using metal leaf flakes but ended up covering them.

Lessons Learned So Far
Well, I have learned that the more layers I add, the table top looks all rippled and lumpy. But then we are talking about 3 litres of liquid mixed in with pigments/mica powders and glitters.  I recommend having more of a plan. We love the end result but I am disappointed about the lumpy
look. When you touch it, it is fairly smooth. We will both find out the very final end result in a few more videos. I hope to finish today! I say that every day.

If possible buy the flakes in larger sizes, it got costly using teeny pots that empty so fast.
The Primary Elements by Lumiere are amazing. A little goes a long way. The deep colours are mega intense. A few specks of indigo goes a long way too.

Always stir the polyurethane before using!
Pearl Ex Powders


I did try the colour shifting paint from Folk Art but did not like it - very unpigmented,

Hope you are inspired a little.
Part two is coming soon.


Tuesday, May 9, 2017

Polymer Clay Journey: Make Mica Powder Swatches

Howdy fellow artists! As many of you may already know, Visual artists love colour. It makes sense that God, our Creator, Thee most Perfect Artist ever, created not just our eyes to see - but the bazillion of colors all around us. It is why some of us have an art supplies. Count me in as one of those people.
Since I began working in polymer clay, aside from chalk pastels, paints and polymer clay... I love them all and have gotten into the collecting of mica powders. They may be best known by a couple of brand names Pearl Ex and Perfect Pearls. Mica is actually a natural mineral that somehow has been processed in a manner that has been turned into a fine powdered pigment with great shimmer and special effects. It can be used on raw polymer clay or mixed into glazes, clays, liquid clay, gel mediums for acrylics and the like - even water and a spray bottle.
Not Just Eyeshadow!
It is probably most familiar as eyeshadow. So if you can't afford the jars, do what I first did and buy a thirty or more plus eye shadow palette on Ebay for under ten dollars! You can use the myriad of colours to add dimension to your polymer clay pieces!
Swatch Out!
Below is a video with more details about making swatches of your powders as well as some important notes about Primary Elements Pigment/Mica Powders by Luminary. Take a look.
Be inspired!

HeArtfully Creating,
Anita


Tuesday, April 25, 2017

Polymer Clay Journey: Tips And About Primary Elements Pigment Powders


Primary Elements baked after powders were  mixed with a tad of moisture.
Hi guys! What have you been creating lately? Me? Well, always working on something when I can. Spent about five days recovering some illness, so my productivity was down - that always bums me out. But thank the Good Lord, I am back up to par and ready to get back to work. Keep in mind,
Primary Elements
creating for me is not "work," because I love it!
Primary Elements Pigment Powders - Surprise! 
Primary Elements before baking (I did sprinkle clear
embossing powder hoping to keep it sealed.)
If you are like me, you love adding or incorporating powders to polymer clay. Whether they are glimmer and shimmery like Mica powders or more pigmented powders like chalk pastel or Primary Elements, which are more of a shimmery mica but a pigment. I learned the difficult way that Primary elements can not really be used like Perfect Pearls. I added a colour to the back of a piece, baked it and when I went to glaze it or got it wet, a new colour appeared, it altered.
Primary Elements are beautiful, a little goes along way when added to a medium like water and arabic gum or a liquid polymer clay, or glaze. But, on their own, added to the surface of unbaked clay, they are unstable - meaning the colour can change if water hits, not to mention depending on the hue, the colour may alter to something you
didn't want. You may experience great disappointment when the surface treatment completely changes or seems to come off after baking. Where as mica powders and chalks, don't generally wash off. They adhere to the surface quite well. It may help to seal them in if you don't want any wear off, if it is a jewellery piece.
How Can I Use Them Then?
These can be used in teeny amounts to make paint. Just add a bit to water and you will have shimmery colour to spray on paper or evenly. Let it dry, but, it still might rub off, especially once the clay is baked. But apparently adding some Arabic Gum to the water, binds it together. I am not sure if it will then stand up to Polymer clay.
As well you can have great fun, mixing it into gel mediums or glazes. They act as a binder and will stay on the surface you put it on, including already baked clay. I wouldn't use colour glaze or medium
on raw clay. But you can experiment!
Swatch Out Colours
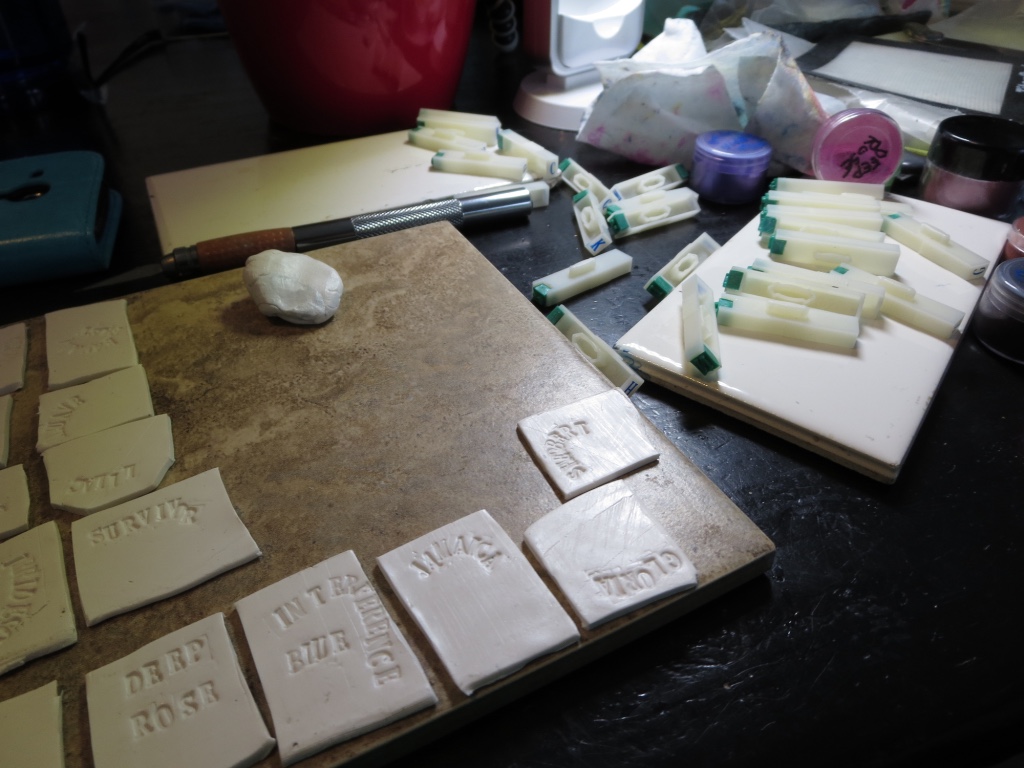
 I wanted to show you how I rolled out back clay and in some cases, I used white too. You may already know that depending on the colour of the clay, the pigment and mica will have varying results. So it is worth swatch out both colours.
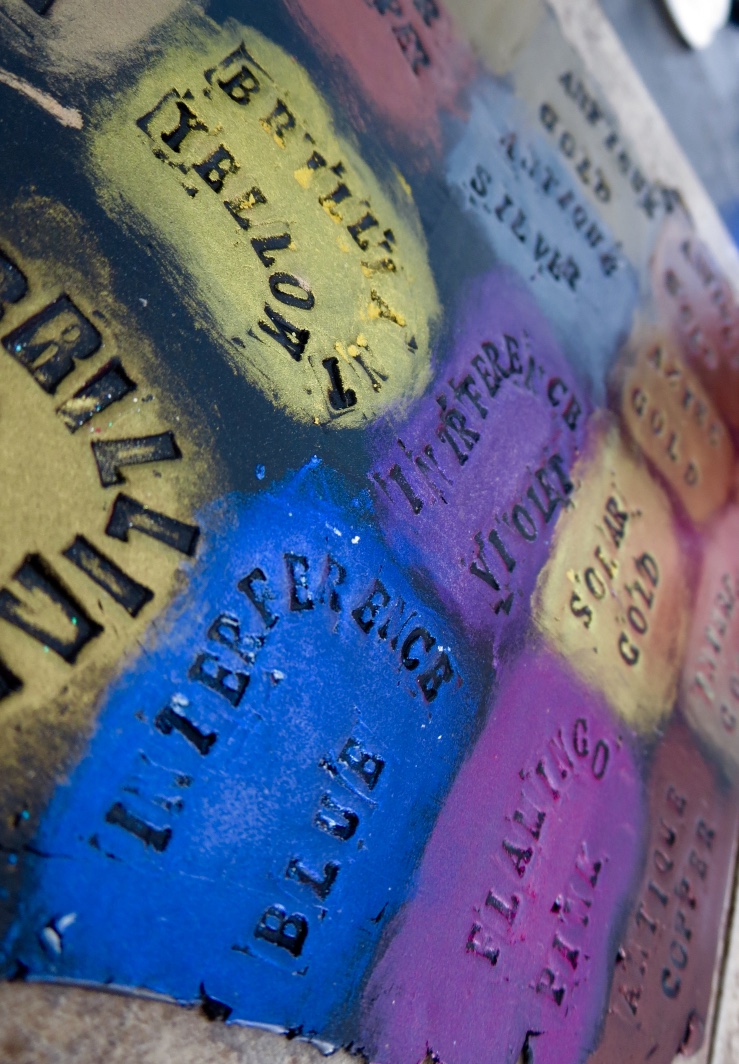
Using rubber letter stamps, I stamped the name of the colour into the wet clay. Cutting the sheet into sort of rectangles. Added the Primary Elements Powdered Pigment that is also mixed with mica shimmer powders. Then to get the true colour, I delicately added a bit of water and just used my fingers to mix it on the surface. Wanting it to not rub off, I sprinkled clear embossing powder on the surface. That s why a couple pics look like they have course sea salt on them!
Fired the clay at the Premo Temperature of 275F. You can use the swatches as a colour reference, attach them into a notebook or throw them into a baggie. I am not super organized :o)
Have fun, experimenting. 
Note:
These Pigments are intense and therefore, will seriously stain fingers. You can purchase finger cots, or cut the fingers off of latex gloves (same thing), or thanks to Val Evans from the Unruly Housewife, you can wrap your finger in cling film.

Have fun! Experiment! Even making colour swatches is mega fun!

Baked on Primary Elements (remember with a sprinkling of clear embossing powder to seal it from making a mess)
Subscribe! Like and Share!! (if you want of course :o)

LIKE HeArtfully Creating Here on FACEBOOK: https://www.facebook.com/HeArtfullyCreating/

HeArtfully Creating Blog: 

A Bergie Creation Shop Blog: http://abergiecreation.blogspot.ca

A BERGIE CREATION - my handmade jewelry shop

Facebook:

Twitter:

YOU Tube Channel

Pinterest:

HeArtfully Creating: