Showing posts with label handmade beads. Show all posts

Tuesday, May 1, 2018

Studio Talk: Polymer Clay Journey Little Tweeties


A video is in the works but for now I wanted to share some pictures of some polymer clay projects that I have been working on. Got a little hooked on leaf and birdie or Tweetie making, enhanced with glass crystals that are called hot fix and are suppose to adhere to the surface when baked in the oven.  (Bought on Ebay for a low cost. A big lesson was learned that I will share in a future post.)
Tweeties
These little Tweeties are about 7-12mm long, They are all handmade with no holds or anything. That means they vary in not just sizes but the shape as well. Of course I try to make them all the same inform but so far it doesn't work out that way. These little guys are accented with teeny faceted glass eyes. They can be used for bracelets, earrings, necklaces or anywhere you want cute little birdie dangles. Some were created using a scrap clay base and covered with a polymer clay cane design. The others were created using marbled clay. It looks really interesting when you use translucent clay mixed with coloured clay and portions of clay with less translucent.
A sampling of my new wee Tweets 


Here are the leaf dangles that are sharped by hand as well. The sizes range from 12mm-about 20mm. Be sure to add bake and bond to insure the faceted glass stones adhere, even if you bought the ones called Hot Fix from Ebay. It was my first time using these. They are AB finished  and beautiful. But, I did find out the hard way that they didn't stick during baking. I   have watched a lot
of tutorials that say if you use the Swarovski brand with adhesive - you don't need to use any adhesive because the glue melds with the polymer while baking. All I can say is, test out the crystals after cooled to make sure. See , a bunch popped off after :o( However, they were not any brand name. You can embed them a little, so the clay wraps around enough to create a bezel like hold. Now I am trying bake and bond.
Below is a picture of how the glass crystals came off like nothing! 
The bling could be picked off easily!
Hope you are inspired to experiment and create in whatever medium you choose.

As I write this, I decided I will make a video to share how beautiful my new Blinged out pieces are turning out! They are intended to be for brides and such! So stay tuned :o) 

Thanks for stopping by!
HeArtfully Creating
Anita

Be sure to share your creations with us at our Heartfully Creating's Facebook Group


Saturday, March 3, 2018

Polymer Clay Journey: Pressed Texture Bead Video Tutorial

Watch How To Make Pressed Texture Beads Below
Hello everyone! Hope you have been creating in whatever way shape or form you prefer. Today, I want to share a video tutorial, a very simple one at that  - about how to make some very simple and beautiful polymer clay beads. Beautiful because they are textural (click here to see my previous articles on making texture plates and rollers) and enhanced with pigment powders. Since I adore chrome chameleon nail art powders and flakes, that what I used. As well as, the forever tried and true, mica powders. If you don't have these powders, you can use sparkly eye shadows. Just don't use them on your eyes after.

You Will Need
💕conditioned polymer clay
💕Texture sheets or stamps
💕bead pins for piercing holes and baking
💕Pins or needle tools, and/or toothpicks or bamboo skewers
💕Mica, nail art and/or pigment powders
💕baking pan
💕card stock folded into a fan fold to lay beads on to bake
💕a bead baking rack or hand made one (skewers or stiff wires running across a baking pan -see my original one here)
💕Aluminium pan or foil to cover beads in oven
💕Ceramic tile to lay on bottom of pan
💕water based stirred polyurethane or glaze suitable for polymer clay
💕An oven set to 275 f if using Premo

HeArtfully Creating,
Anita

Subscribe! Like and Share!! (if you want of course :o)


"LIKE" HeArtfully Creating Here on FACEBOOK

Bergie Creation Shop Blog


A BERGIE CREATION - at Etsy, my handmade jewelry shop

 LIKE ABC On Facebook

ABC On Twitter

YOU Tube Channel

Pinterest


Tuesday, July 25, 2017

POLYMER CLAY JOURNEY: More On Large Hole Tube Beads

I know I recently posted my many photos of some recent handmade tube beads with one really large holed focal beads (click here to see). But, I decided I would take the bazillion pics and make them into a video. I hope it encourages you to create or at least be entertained for a few minutes!

HeArtfully Creating,
Anita

Subscribe! Like and Share!! (if you want of course :o)

LIKE HeArtfully Creating Here on FACEBOOK: https://www.facebook.com/HeArtfullyCr...

HeArtfully Creating Blog:
http://heartfullycreating.blogspot.ca...

A Bergie Creation Shop Blog: http://abergiecreation.blogspot.ca

A BERGIE CREATION - my handmade jewelry shop
www.abergiecreation.etsy.com

Facebook:
https://www.facebook.com/abergiecreation

Twitter:
https://twitter.com/abergiecreation

YOU Tube Channel
https://www.youtube.com/user/anitaand...

Pinterest:
https://www.pinterest.com/abergiecrea...

HeArtfully Creating:
http://heartfullycreating.blogspot.ca

Sure Hope Gazette:
http://surehopegazette.blogspot.ca

Walking Way Overrated
http://walkingwayoverrated.blogspot.ca

TUMBLR
http://anitaberglund.tumblr.com

Sunday, July 16, 2017

Polymer Clay Journey: More Fun Large Holed Beads With Great Textures

Here are some great textured tube beads that I really enjoyed making. But then I love making tube beads. Oh and it helps when you love the colour palette you are working with. Hopefully you will be inspired to try experimenting with colour and textures when you make polymer clay beads.
Colour Mixing 101
Being able to mix colours in polymer clay like you can with paint is a wonderful thing. It is why I love working with polymer clay, painting in three dimensions! These beads were made by creating a colour been using a technique called the "Skinner Blend." It was created by someone named Judith Skinner. You can make it with a roller or a pasta/clay machine. Click here to see a tutorial on how to create a skinner blend, by a great new channel I like called "Jessama Tutorials."

Some folks like to mix colours of clay that are premixed by the company that makes the clay. It is a good way to start. But if you love colour mixing like I do, you often like to mix your own colours first and then put them into a skinner blend mix. These beads were created a little while ago so I can't remember for sure what I did. I think I used ready Mix colours, Premo (pretty much the only clay I use) Turquoise, Wasabi and Purple. Then they blend into some really great variations.


It is helpful to know the basics of colour mixing to achieve a palette you would like. Click here for some Colour Wheel Images. 
In Paint it is easy to mix combinations of paint do see what colours create when combined. With Polymer Clay you can practice using little amounts if you want to by smooshing little portions of clay. 
It helps to know the basics of colour mixing. 
Primary Colours are:  RED, YELLOW and BLUE. They are called Primary because we can't create them, hence the name "primary."
*Colour Note: of all colour results will vary depending on the primaries you use to begin with. For example mixing Cobalt Blue and Alizarin Crimson make a different purple than Cadmium Red mixed with Cobalt Blue.

Secondary Colours meaning we need to take two Primaries to make a Secondary colour: BLUE + RED = VIOLET/PURPLE
RED +  YELLOW= ORANGE
BLUE + YELLOW= GREEN
Tertiary Colours are when we combine three colours to achieve yet another colour! 

Analogous colour palette is what I ended up using for these beads. Analogous means using colours that are beside each other on the colour wheel.
Complimentary Colours are when you use colours that are opposite each other on the Colour Wheel. Because they are opposite, it is a great way to make a colour "pop!" Experiment, have fun and create what you love!
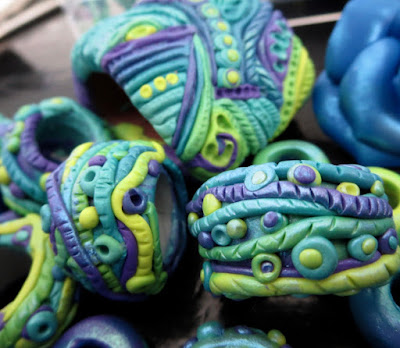
Here are some of these fun textured, large hole beads and one very large focal bead! Take a look....
Using a Skinner blend (see the sheet in the back.) Making a large focal bead began with  one idea, making thin strips and laying them down in various patterns. That was all I was going to do. But then....

Then I started using my dotting tool to add textures and designs in the surface. As well, I started adding small balls of clay. When you create, try different things like adding shapes, textures, contrasting colours...whatever you think looks good to you. Adding interest makes your art work something you and others want to look at.


Since I love designing beads, I also made an array of smaller tube beads. Save all your bits of clay so you can make  elements like dots and strips and whatever you can think of.

To bake, I just made a paper accordion or fan out of card stock, then the beads can just lay there, safe and secure.  As well, I have baked using kleenex or tissue all puffed up. It won't burn at 275 Fahrenheit. Just make sure it doesn't touch the element. 


To highlight areas and add shimmer, I did dust on some mica powders. Use your own preference. I just like shimmery mica powders.


Here they are. All cooled and ready to be turned into wearable art!