Showing posts with label how to make colour samples. Show all posts

Wednesday, January 24, 2018

STUDIO TALK: Art Supplies- Procrastinating and Swatching Alcohol Inks, Pens and Paints

Hi guys! First I want to apologize because I just noticed that I accidentally shared a post last night about my earring meant to be shared on my A Bergie Creation Shop blog. I will leave it, but  I was clearly on the sleepy side to mis-post that.
Art Supply Addiction?
Anyhoo, back to what I wanted to share. If you love creating, then you also may love art supplies!
oooooo.....art supplies. I do love using these gel pens.
Actually, I kind of like to collect art making supplies. This may be you too. I buy supplies thinking at the moment that I need that so I can use it for....(fill in the blank). So I buy whatever it is and often never end up using whatever it may be. Afterall, you never know right?

First I Must...
Have you ever set out to create, but then didn't start  creating because you got it stuck in your head that you just can't make anything until you re-organize your art supplies and/or studio first? Happens to me all the time. Nothing wrong with organizing your supplies or space but, it never ends up the way I said it would! All tidied up, re-sorted my tools and what not and the day is over with no art work.. Not even a doodle!
Pilot Retractable  Gel Pens
Well, one way to organize but at least create something, is to make swatches of some of those art supplies. Take a look and see. The gel pens from Pilot are one supply I do use. Gel pens normally frustrate me because they dry out. Because my hands are weak, I can't do the lid thing. So I found these great retractable gel pens that open and close with ust a click. Love them! Here are the swatches I doodled as I organized :o)
Adirondack Alcohol Inks
These inks are great for colouring polymer clay, metal and basically any surface- including your fingers! I did sample two Pinata alcohol inks that are metallics, silver and gold. Check out my swatch  blobs. You can make your swatches as neat and tidy as you want or be more organic and free form like I tend to be. Take a look.

How do you organize your pens, paints, inks and such?
Do you collect Art Supplies?
What are your top three art supplies?
My "Artistic" Ink Swatches   


Pinata Ink -Gold And Silver (Shake First!)


Lumiere Metallic - Jewel Colours Decorative Paints
I bought a sample set of these beautiful paints to use with my polymer clay pieces. To have a visual record of their beauty, I blended colours into each other. The metallic paints. inks and clays are so beautiful. I adore glitter and anything that sparkles and glistens.
Remember to shake or stir all thinks metallic because usually there are Mica particles that settle to the bottom.


What's your Answer? 
I would love to hear. Just answer below in the comments or come join us at HeArtfully Creating Group and/Or Page.

How do YOU organize your pens, paints, inks and such?
Do you Like to collect Art Supplies?
What are YOUR top three art supplies?

HeArtfully Creating,
Anita

Subscribe! Like and Share!! (if you want of course :o)

"LIKE" HeArtfully Creating Here on FACEBOOK

A Bergie Creation Shop Blog

A BERGIE CREATION - at Etsy, my handmade jewelry shop

 LIKE ABC On Facebook

ABC On Twitter

YOU Tube Channel

Pinterest

Tuesday, April 25, 2017

Polymer Clay Journey: Tips And About Primary Elements Pigment Powders


Primary Elements baked after powders were  mixed with a tad of moisture.
Hi guys! What have you been creating lately? Me? Well, always working on something when I can. Spent about five days recovering some illness, so my productivity was down - that always bums me out. But thank the Good Lord, I am back up to par and ready to get back to work. Keep in mind,
Primary Elements
creating for me is not "work," because I love it!
Primary Elements Pigment Powders - Surprise! 
Primary Elements before baking (I did sprinkle clear
embossing powder hoping to keep it sealed.)
If you are like me, you love adding or incorporating powders to polymer clay. Whether they are glimmer and shimmery like Mica powders or more pigmented powders like chalk pastel or Primary Elements, which are more of a shimmery mica but a pigment. I learned the difficult way that Primary elements can not really be used like Perfect Pearls. I added a colour to the back of a piece, baked it and when I went to glaze it or got it wet, a new colour appeared, it altered.
Primary Elements are beautiful, a little goes along way when added to a medium like water and arabic gum or a liquid polymer clay, or glaze. But, on their own, added to the surface of unbaked clay, they are unstable - meaning the colour can change if water hits, not to mention depending on the hue, the colour may alter to something you
didn't want. You may experience great disappointment when the surface treatment completely changes or seems to come off after baking. Where as mica powders and chalks, don't generally wash off. They adhere to the surface quite well. It may help to seal them in if you don't want any wear off, if it is a jewellery piece.
How Can I Use Them Then?
These can be used in teeny amounts to make paint. Just add a bit to water and you will have shimmery colour to spray on paper or evenly. Let it dry, but, it still might rub off, especially once the clay is baked. But apparently adding some Arabic Gum to the water, binds it together. I am not sure if it will then stand up to Polymer clay.
As well you can have great fun, mixing it into gel mediums or glazes. They act as a binder and will stay on the surface you put it on, including already baked clay. I wouldn't use colour glaze or medium
on raw clay. But you can experiment!
Swatch Out Colours
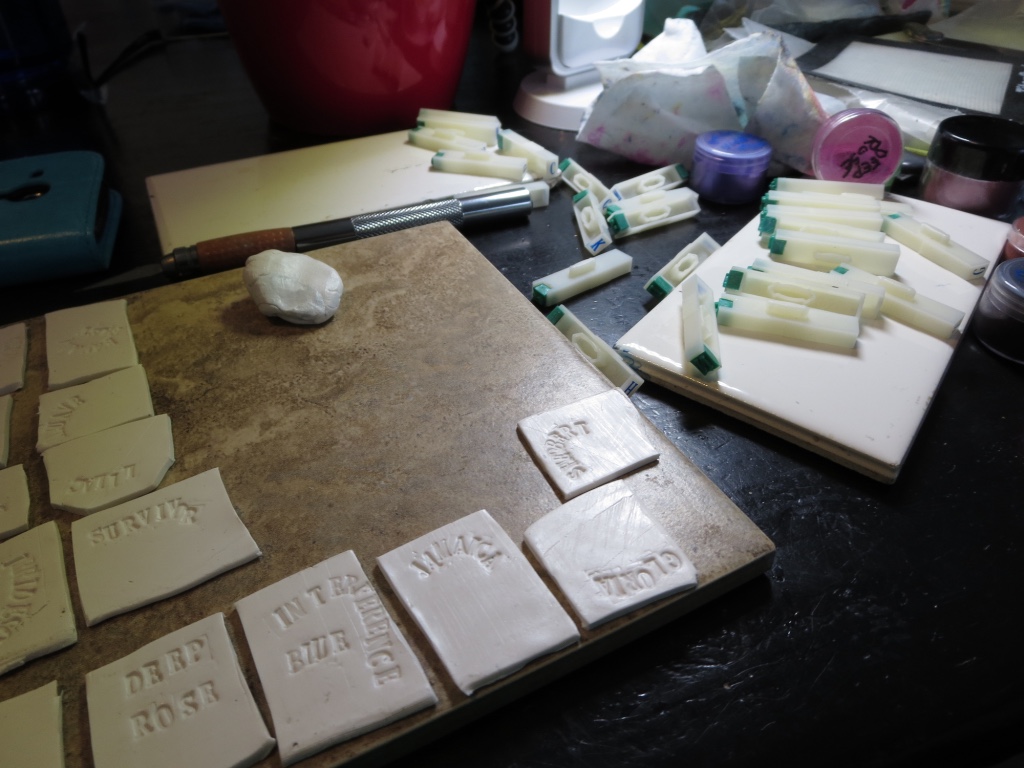
 I wanted to show you how I rolled out back clay and in some cases, I used white too. You may already know that depending on the colour of the clay, the pigment and mica will have varying results. So it is worth swatch out both colours.
Using rubber letter stamps, I stamped the name of the colour into the wet clay. Cutting the sheet into sort of rectangles. Added the Primary Elements Powdered Pigment that is also mixed with mica shimmer powders. Then to get the true colour, I delicately added a bit of water and just used my fingers to mix it on the surface. Wanting it to not rub off, I sprinkled clear embossing powder on the surface. That s why a couple pics look like they have course sea salt on them!
Fired the clay at the Premo Temperature of 275F. You can use the swatches as a colour reference, attach them into a notebook or throw them into a baggie. I am not super organized :o)
Have fun, experimenting. 
Note:
These Pigments are intense and therefore, will seriously stain fingers. You can purchase finger cots, or cut the fingers off of latex gloves (same thing), or thanks to Val Evans from the Unruly Housewife, you can wrap your finger in cling film.

Have fun! Experiment! Even making colour swatches is mega fun!

Baked on Primary Elements (remember with a sprinkling of clear embossing powder to seal it from making a mess)
Subscribe! Like and Share!! (if you want of course :o)

LIKE HeArtfully Creating Here on FACEBOOK: https://www.facebook.com/HeArtfullyCreating/

HeArtfully Creating Blog: 

A Bergie Creation Shop Blog: http://abergiecreation.blogspot.ca

A BERGIE CREATION - my handmade jewelry shop

Facebook:

Twitter:

YOU Tube Channel

Pinterest:

HeArtfully Creating: