Friday, October 20, 2017

My Polymer Clay Journey: Leaves Are In The Air! - Making Multiple Charms From Original Molds

UPDATE: Yay! Click here to see the new video on YouTube that supplements tis tutorial.

___________________


I have been having some fun with the new nail art powders and ended up creating some really beautiful  autumn leaves for bracelet or necklaces, or what ever you wish.

How did I create these?
The molds I made of my own leaf designs
I like to create my own images and texture sheets as you know.  so for this project I wanted to make multiple images of the same thing. In light of the fact that it is autumn, it makes sense that I dug up some original molds.

A couple of years ago I made a couple of these original leaf shapes. Since I was experimenting making my own molding compound, using silicone caulking (very stuff we use to seal up our bathroom sinks and such) some corn starch and a bit of acrylic paint for colour, I made molds of these two leaves. You can find DIY’s for this silicone mold making technique online. It works, but takes practice- getting the correct consistency. Needless to say, for me personally, I ended up buying a box of ready-made mold maker. In the photos you'll see the yellow molds, those are the store bought mold maker. And the turquoise blue one, is my home made compound. I did try using it last week, but it wasn't as smooth as a store-bought mold maker.
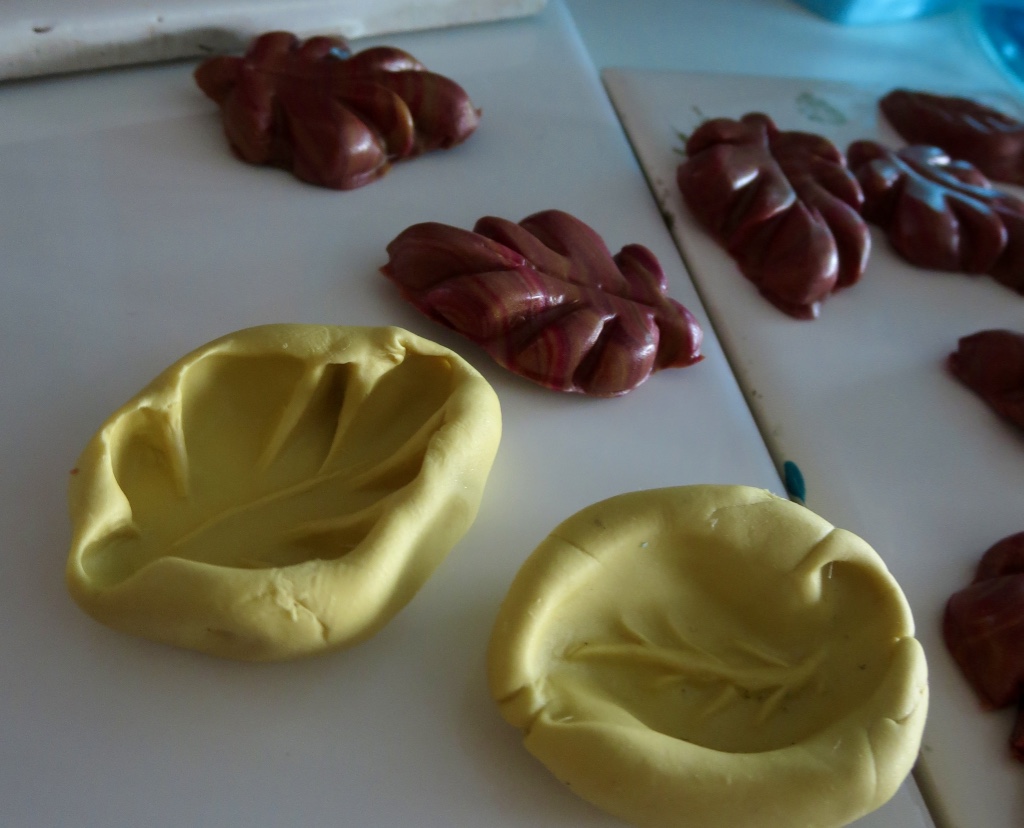
I carefully removed each one from their mold, making sure everything is smooth with no cracks or dents.

The clay that I used for these pieces, was Premo brand translucent. I added colour by using alcohol inks and marbleized it. The clay needs to be soft and conditioned in order to push it into the molds. 
The leaves just pulled from the molds. Not cleaned up yet.

Laying them all out, I cleaned each piece up- using a craft blade, making sure nothing was messy or scraggly. 


Bake me!

I used a green mica powder to highlight the veins, then later, I switched to  a blue powder.

Then I highlighted each piece with a few coloured nail powders (really they are mica powders)
I wanted to make the backs neat so I pressed them on to a texture stamp

Laying them all out, I cleaned each piece up- making sure nothing was messy or scraggly. Then I highlighted each piece (front and back) with a few coloured mica powders. You  can leave the clay colour alone if you want to, or use powdered chalk pastels. As well, you can use surface enhancing techniques after fired, using gilders paste, Inka Gold paste, acrylic paint...up to you. 

Bake them on a card stock sheet or a non-shiny ceramic tile (shiny results in a too shiny back). I bake everything for at least one hour (covered with tin foil). 


Love experimenting with my new chrome  pigment nail art powders (Mica with two tones-depending on the lighting)

I cut little pieces of  twenty gauge wire, forming them into a loop shape. Then using pliers, I carefully inserted the the irregular end into the part of the leaf, that I wanted it to hang from. you can use jump rings  if you don't want to make your own wire loops. They loops will not fall out if you have  a bended part tucked into the clay.

Try placing the hanging loops in a variety of places to create interest.
After, I coated them after with satin Polyurethane. They almost have a faux Raku finish.


You can see the blue veins


Here are some more photos. Hope you are inspired a little.


HeArtfully Creating,

Anita

Friday, October 13, 2017

Polymer Clay Journey: Even MORE Faux Stained Glass - Window Clingies


WATCH "Even MORE Faux Stained Glass"
Watch this video right below↓ here


I'm talking about. Not going to let that get me down, so here are some more of my recent faux stained glass window clingies.

To learn how to make them, click here to see my last tutorial on faux stained-glass. And yes as soon as YouTube realizes their censoring software or algorithm thingy misinterpreted a word or phrase as something inappropriate, the sooner I can can get back to making better videos. I will re-post the video that goes with the "how-to tutorial).
If you follow this blog at all, you know I create videos not just to share the "how-to" part, but because I can't stop taking pictures, so videos provide a way to share the pics. Otherwise, my posts, like this one- become loaded with far too many photos and can be hard to follow.

Simple videos
For now, I am testing out the feature on blogspot to upload simple (no frills) basic videos via this site (the blurry image at the top of this page). Hope the simple "new" way  of making videos helps to make this video a bit more enjoyable.

Thanks for stopping by.
HeArtfully Creating,
Anita

at the "adding and mixing inks" in stage.

Subscribe! Like and Share!! (if you want of course :o)

LIKE HeArtfully Creating Here on FACEBOOK: https://www.facebook.com/HeArtfullyCr...

HeArtfully Creating Blog:
http://heartfullycreating.blogspot.ca...

A Bergie Creation Shop Blog: http://abergiecreation.blogspot.ca

A BERGIE CREATION - my handmade jewelry shop
www.abergiecreation.etsy.com

Facebook:
https://www.facebook.com/abergiecreation

Twitter:
https://twitter.com/abergiecreation

YOU Tube Channel
https://www.youtube.com/user/anitaand...

Pinterest:
https://www.pinterest.com/abergiecrea...
Autumn themed clingies


HeArtfully Creating:
http://heartfullycreating.blogspot.ca

Sure Hope Gazette:
http://surehopegazette.blogspot.ca

Walking Way Overrated
http://walkingwayoverrated.blogspot.ca

TUMBLR
http://anitaberglund.tumblr.com
Can you see the "mooning" I mentioned?

Can you see the "mooning" I mentioned?


Wednesday, October 11, 2017

STRIKES?? No YouTube Videos For Now....

Hi guys. After three upload attempts  to YouTube, I keep receiving "Community Guidelines" Strikes. Nothing like that has ever happened before so I am trying to be patient while I wait for the results of my appeal. In no way did anything in my faux stained glass tutorial violate YT's guidelines. Based on what I have learned, I re-watched the video and though maybe the computer algorithm thingy mis-heard a word on my video. Some words apparently cause red flags when YouTubers post videos with those words. I don't  understand how they can twist and flag videos like mine, a clearly "safe," one - disrupting all productivity, based on non-human judgments. Oh well, nothing I can do now but wait for them to deal with my appeals.
I will still be posting articles, but for now, they just won't come with the videos that I love making.
Watch My First Non-YouTube Video Post Below :o)

Tuesday, October 10, 2017

Polymer Clay Journey- MORE Faux Stained Glass And Window Clingies!!

Thanks for stopping by.

Update regarding The corresponding video Or this tutorial:
For some bizarre reason, I have tried to load the video  for this faux Stained glass tutorial Three different times And I keep getting a community guidelines strike against them. That means the video Is not available to watch.  I am leaving the article here as it is, And of course I am appealing the strikes against my YouTube channel. Once everything is corrected, I will re-upload the video And try again. No doubt it is very frustrating When you know you did not violate any guidelines. 
Yay! I finally finished another faux stained glass tutorial! I love doing them is so much, that I can just stop at one or two videos.  (Click here to see the first one)
So there'll be a few more to come.  If you want to know more keep reading first :0)
Making Faux Stain glass Window Cling

What you will need...
First of all, you need to create these on a shiny ceramic tile or a piece of glass. Make sure there are no bumps or dents or textures in the ceramic tile. When the liquid clay cures, the part that is in contact with the tile becomes super shiny and smooth- able to cling to your window or mirror.

💗1. a shiny ceramic tile or piece of glass
💗2. translucent liquid polymer clay (see more in the video)
💗3. alcohol ink
💗4. polymer clay tools such as: a craft knife, a toothpick or needle tool
💗5. baby wipes
💗6. an oven
💗7. solid polymer clay (I used Premo in silver and black - mixed together)
💗8. your imagination

I'm just going to tell you how I created my window clings and you can take it from there, to do it however you wish.
Step number one.
Mixing your clay for the leading part:
I mixed black clay with some silver clay, until it looks about the color of stained glass window leading. You don't have to make that colour, it is up to you. I used black and silver Premo.
Step number two.
What do you want it to look like?
To avoid wasting time if you're concerned about that,  draw on paper what you would like to create. Remember, because it is faux or imitation stained-glass, the goal is to create images that resemble how stained glass looks, that means keeping your images somewhat simple or abstract-ish. I broke up my flower into simple shapes that I could fill with liquid clay.
Step number three.
Drawing with the clay:
Roll out your faux leading, into long thin "logs." Depending on the size of the piece you are making, try keeping it in proportion to that. For instance, if I was making a flower 3 inches in diameter, my leading would be about a quarter inch round, or even a little less. To me it just wouldn't look right if I made it a half-inch thick. It's fun to experiment with different thicknesses. But, the heavy lines will take away from the transparent coloured glow of the "faux" glass.

QUICK TIPS: is to make sure that it is thick enough to hold in the liquid clay. The shallower the strips of clay, the less liquid clay you can use and therefore, it may be so fragile it could rip easily.

Never being one to prepare much, I just start laying down the black lines to create the image that's in
my head. That definitely means rearranging pieces  accordingly.  You can do the same thing, it's just more efficient if you draw it out first. Being a visual artist, I am definitely into  figuring it out as I go. Again, your preference.  That's probably why my high school English marks were so low- proofreading and rough drafts, never been my forte.

Yeah make sure when you're putting the lines down, that you're pressing them onto the tile and glass enough to stick it down. You're essentially creating a seal that will hold the liquid clay you're about to pour it.

Step number four: 
Flooding the shapes-  Think "flooding" a skating rink? I used a couple of kinds of Clay,  Kato and Sculpey. I have tried mixing the two brands together at times. I don't really know what happened, because I didn't keep track of which pieces had which kinds of clays or mixes. Perhaps that was when the "mooning" happened on one of my pieces. It's always fun to experiment and try things anyway, how else can we learn?

Now you just start to add the liquid clay into each shaped, within the black lines. The Sculpey Clay is handy because it already has a pointy tip. Pointy tips, like a restaurant ketchup containers, make squirting liquid in a controlled fashion, much easier. You can transfer the liquid clay into a squeeze bottle, just make sure it is a compatible type of plastic. Or you can pour it onto a Glass dish or something like  that,  and use a toothpick or popsicle stick to scoop it up and drip it into your shapes. In fact, I believe most liquid clays are self levelling. So cover the surface with a thin layer and wait a few minutes to let it shift and level.

Push it around to fill in any exposed surfaces on the tile. Be careful not to overfill it, if you do, remove it with a popsicle stick or a toothpick.

Step number five:  Creating the stained Glass Effect
Remember you're creating a coloured stained "glass," that light can shine through so you need to use a colouring method, that is transparent. So the best colouring method that I know of is alcohol Ink. I used the Adirondack ink. A teeny bit goes a long way. More about colouring is covered in the video.

Step number six: Curing your "stained glass"- Preheat your oven at 275 Fahrenheit (if you are using Premo like I did) Place your tile on our designated baking pan and bake for at least.

Liquid Polymer clays, according to label directions cure at a higher temperature. I have never tried that. If the only ingredient was that kind of clay, then I would use the higher temp. But because I used solid clay- I bake at that temperature.

Best Quick Tip From This Project: do not use mica powders or chalk pastels powders, are any kind of paint. I made the mistake of using Mica powder and ruined one of my flowers  because the light can NOT shine through Mica powder. Made for a sparkly flower though!

Thursday, September 28, 2017

Polymer Clay Journey: Practical Projects - DIY Cord Holders


In these modern times we may  have cordless devices everywhere, but have you noticed all the cords we still need? All devices still require cords to charge. And then there are all our other tangled web of electrical cords. Always looks messy, right? Wanting to make some sort of method to contain them, the idea came to use paper towel or toilet paper rolls and/or small metal cylinders wrapped in wax paper, to create a spring action coil. A way to easily get the cords to slip inside and be contained, using a neat and artistic method.
Watch Video Below!
You can see in the video below, the shape of the cord holders. 


How I Made Them:
It is pretty easy. Roll out a long thick cylinder or sausage (depends on how long you want your holder ), and flatten it out by rolling it out by rolling a texture plate or roller (see my original texture makers). Don't make it too thin or they won't be strong enough.

I decorated the surface with mica powders. Then I laid the pieces on a designated baking pan on top of kleenex that I puff up. As well, you can use polyester fiber fill. Then your pieces will not get a flat spot.

Bake at 275F if using Premo. Always bake all items for at least one hour, it makes them stronger.  Let cool. Remember polymer clay is a plastic, not hard like earthen clay.

Special Holder Design in the video
You will see this holder in the video that is not a coil shape. For this one, I cover a metal cannoli form with wax paper and then wrapped a square sheet of clay in
a diamond fashioned. Leaving the corner that overlaps the clay free and laying a piece of wax paper between the end corner section and where it over laps. Then I baked it and before it was fully cooled, I carefully pulled it off the form and removed the wax paper between the clay layer. The cords slip in by just gently pulling the end corner away from the under part  and pushing the cords inside. It is just another practical way to organize your jumbled cords. I made smaller and large ones. Depends on the thickness of your cord sizes.

Hope you give it a try. Let me know how it goes.

HeArtfully Creating,
Anita 

 💕💕💕💕💕💕💕💕💕💕💕💕💕💕💕💕💕💕💕💕

Subscribe! Like and Share!! (if you want of course :o)

"LIKE" HeArtfully Creating Here on FACEBOOK: https://www.facebook.com/HeArtfullyCreating/

HeArtfully Creating Blog: 

A Bergie Creation Shop Blog: http://abergiecreation.blogspot.ca

A BERGIE CREATION - my handmade jewelry shop

Facebook:

Twitter:

YOU Tube Channel

Pinterest:

HeArtfully Creating: 

Thursday, September 21, 2017

INSIDE MY STUDIO: What Have I Been Up To?

Hello! Just wanting to share some pics to share what I have been having fun with lately. One thing was coming up with a practical way to use my polymer clay to help hold in a bundle of electrical and computer cords. I will do more on that in he future. But want to share some fun stuff now! Hope you have been finding inspiration and creating!
A cord collector I made with Polymer Clay!


Painting On glass With he Lumiere paints


Trying to make glass eyes....more in the future I hope....

Making Alcohol Ink Swatches 
Love these new pens! 
You will see more about faux stained glass in the future... :o)

New powders
 💕💕💕💕💕💕💕💕💕💕💕💕💕💕💕💕💕💕💕💕

Subscribe! Like and Share!! (if you want of course :o)

"LIKE" HeArtfully Creating Here on FACEBOOK: https://www.facebook.com/HeArtfullyCreating/

HeArtfully Creating Blog: 

A Bergie Creation Shop Blog: http://abergiecreation.blogspot.ca

A BERGIE CREATION - my handmade jewelry shop

Facebook:

Twitter:

YOU Tube Channel

Pinterest:

HeArtfully Creating: 


Sunday, September 10, 2017

POLYMER CLAY JOURNEY: My New Invention- Texture Rocks or "Rockit"

If you love working in polymer clay like I do, you probably love creating textures in your clay. And you may already know about creating your own
texture Plates, Sheets, Or rollers. Have you ever heard of texture rockers though? If you have I would love to hear about it, so I won't wrongly take credit. I do think there may be styles of rubber ink text or number stamps for things like administrative purposes, such as a date stamp or a word like "CANCELLED" across your unpaid cable bill, ha ha.

As for the kind I am sharing with you, I like to think that I invented them as a solution for those of us with weakened or arthritic hands or those of us who can't stand up to apply even pressure.  If you have learned from watching polymer clay tutorials, like I have, Then you will know that it is often recommended when impressing a texture that you should stand up and press down hard and evenly. Can't stand? Then you are with me maybe on how to find a solution to figure out how else to do it. That is why I am sharing this new video with you. It is about the TEXTURE ROCKERS or my new name may be "Rockit!" Hey, any big corporation like Makins or Polyform interested mass producing my idea, ha ha. No seriously, anyone? Of course, if I didn't invent this concept then, no million dollar invention for me 😁 

The theory is that if you cannot stand up to push down on your texture stamp or plate, that way or you just don't want to, you can use the rounded texture surface and just push as much as you can and rock it back and forth on the clay, until it is how you want it to be. Therefore,  making impressing textures and such possible or easier. That was my theory anyway. To find out if it worked Please watch the video below!!
Watch "Rockit" in Action Here:

Please share your thoughts, or ideas below and don't forget to subscribe if you want to stay up to date on posts and videos!
 💕💕💕💕💕💕💕💕💕💕💕💕💕💕💕💕💕💕💕💕

Subscribe! Like and Share!! (if you want of course :o)

"LIKE" HeArtfully Creating Here on FACEBOOK: https://www.facebook.com/HeArtfullyCreating/

HeArtfully Creating Blog: 

A Bergie Creation Shop Blog: http://abergiecreation.blogspot.ca

A BERGIE CREATION - my handmade jewelry shop

Facebook:

Twitter:

YOU Tube Channel

Pinterest:

HeArtfully Creating: 


Thursday, September 7, 2017

POLYMER CLAY JOURNEY: More Textures...Is This An Octopus?

Sorry, I haven't completed that second texture Rocker and Roller video yet. But for now, I wanted to share this really cool texture rocker that I sculpted. By the time I was done, I thought it looked like a mess of Octopus tentacles. What do you think?
A Lesson Learned
I explained in this video/post (click here) about creating texture "Rockers" to make it easier to use for those of us with weak hands. (So much for that theory.) As you can see, it definitely impressed textures but, my details were to deep and detailed. That meant, a couple of impressed areas tore up. As well, I couldn't rock it, I had to lay the sheet on the texture rocker and press it in.
How can we learn if we don't try things out!
Hope you feel a little inspired.


 Thanks for stopping by.
HeArtfully Creating,
Anita

Subscribe! Like and Share!! (if you want of course :o)

LIKE HeArtfully Creating Here on FACEBOOK: https://www.facebook.com/HeArtfullyCr...

HeArtfully Creating Blog:
http://heartfullycreating.blogspot.ca...

A Bergie Creation Shop Blog: http://abergiecreation.blogspot.ca

A BERGIE CREATION - my handmade jewelry shop
www.abergiecreation.etsy.com

Facebook:
https://www.facebook.com/abergiecreation

Twitter:
https://twitter.com/abergiecreation

YOU Tube Channel
https://www.youtube.com/user/anitaand...

Pinterest:
https://www.pinterest.com/abergiecrea...

HeArtfully Creating:
http://heartfullycreating.blogspot.ca

Sure Hope Gazette:
http://surehopegazette.blogspot.ca

Walking Way Overrated
http://walkingwayoverrated.blogspot.ca

TUMBLR
http://anitaberglund.tumblr.com