Friday, June 19, 2015

Polymer Clay Adventures - Love "THE JESSE" Part 2

 In a previous blog (click here) I was sharing my one and only (so far) three dimensional polymer clay
figurine/sculpture that I made to celebrate my dear nephew's life. Wanting it to be as special and unique as possible, I decided to try my newest love, polymer clay. Check out part one to see where we began and how we got there.
In this last part, I just want to share detailed photos of the work in progress and then the completed figure. I hope to put a YouTube mini doc together when I get time.
It is amazing to see how artwork changes from beginning to end. Look and see!
In the beginning, he looked very different..
And he looked like this...
 Off to the Oven he goes....
Bit by bit, piece by piece....he changed....
I changed out his eyes at least eight times....

Slowly he starts to look like my original vision....

From behind...

From the front...

Adding a friend....

Detail by detail...


by detail...


The Final Edit


Poppies....So Inspiring

Poppy slices I made from polymer clay.
God's Creation
I love flowers and I love creating. It only made sense to learn how to make my favourite flower out of
From our garden
fabric, then they wouldn't die like all flowers have to do. Below are a couple of photos of the gorgeous blooms we are blessed with year after year that inspired me to create. 

You can see why I would want to try to have these flowers in our home all year round. As you will see, creating two dimensional poppies is one of my favourite things to do. Including recently, as I have been learning how to use polymer clay. To the right, after watching many YouTube tutorials, I figured out how to make a "Poppy" cane out of polymer clay. (I will be writing more about polymer cane making in the future.) For now, I just wanted to share these photos so you can see what we can create when we are inspired by God's creation. 
Our garden
Inspired to Create
Most of us are inspired to create because of others who create. God being Thee number one Creator, His creation is perfect. We are created in His image, so it makes sense to me that we love creating. His creation has inspired me my entire life. It is important to use your eyes, and other senses to seek out things that stir your creativity. 
My polymer poppy can- pencil holder can
Capture Inspiration
I suggest that if you see anything that stirs your heart to create, take pictures of it so you have them to refer to when you are ready to create. Ideally, if you can draw or paint outside, in real life, instead of using a photograph, then go for it. Whether you choose to draw it, paint it, sculpt, use textiles like fabric, thread, yarn, knitting, stitchery, cut it out in paper... in polymer clay like I have done already or whatever method you want, create away. The methods we can use to make art or create, is endless. I receive my inspiration from looking at what other artists do as well as whatever God makes.
Photography itself is not only a great way to record images you can create from, but it is also a way to express yourself creatively. Photos themselves are works of art.
My Poppies...Painted
Since this is about Poppies, as you will see Poppies are one of my most favourite sources of inspiration.
The poppy flowers we grew from seeds to plants that return yearly in our garden, inspire me to take tonnes of photos and the photos inspire me to paint and draw and now make using polymer clay and in fabric. 
Over the last twenty to thirty years as an artist, I use to only paint and draw poppies in two dimensions. Two dimensions means the art work has height and width. I wanted to share some of those paintings with you so you can see just how one flower inspires to create. And then I will show you how the poppy also has inspired me to creating it in three dimensional form. Three dimensions are what we are, we have height, width and depth. Ever been to a 3D movie?

A poppy I painted using Acrylic paint. By Anita Berglund Copyright

A poppy I painted using Acrylic paint. By Anita Berglund Copyright
This Poppy - I tried to be more abstract with

I do love blue, this is called an Himalayan Poppy - by Anita Berglund
Four canvasses make up this poppy painting I did over fifteen years ago


My Poppies in Three Dimension

I love oriental poppies and wanted to try to learn how to make my own in fabric. When I first started out, I made a couple as hair ornaments using fabric.
This poppy was made using satin and beads sewn in place.
Organza poppy made by Anita Berglund
Ideas of what you could made with a handmade flower...that's me, Anita

Ready for Lift Size Poppies
After some research I was blessed with the idea to make life size poppies to decorate our home. Take a look...if I can make these, you can too.
They were made using taffeta fabric, a lot of tea lights and matches to melt the edges of the petals. The centre part of the poppy, was constructed using a cotton ball stuffing that has been packed into a stitched circle of fabric including a layer of organza for sparkle and a stretchy black jersey, then tightened and stitched to form, a flat orb, think tangerine or persimmons. To make the pie slice like sections, I jammed a thick darning needle down the centre of the orb with a thin black cord and came back out and back in around and around until the centre was looking similar to a real poppy centre. The black fuzzy stamens in a real oriental poppy are velvet and fluffy. Mine were made with a lot of hot glue gun blisters as I glued pieces of whatever thinnish black string or cording I could find all around the underside of the "orb" centre.

A LOT of hot glue was used...Oh right, the petals were secured with the hot glue and a long 18 gauge floral stem was connected to the center part. Once it was all where I wanted it to be, I needed to buy and cut thin wooden dowels for stability. To make the stems look more stem like, I wrapped them in green floral tape.
Bouquet number one sits in our living area. Red is such a nice pop of colour.


Can you see the divided section in the centre.
Here is one out of two bouquet's that I made. So rewarding and beautiful.

SO MUCH FUN!

This project was so much fun. Even when something is time consuming, if you love it, you'll do it.

The size of the flowers across, are about ten inches. I have noticed that keeping the petals from drooping is tricky. Anyone have any ideas? let me know. :o)


Tuesday, May 19, 2015

Polymer Clay Adventures- The Jesse, Part 1

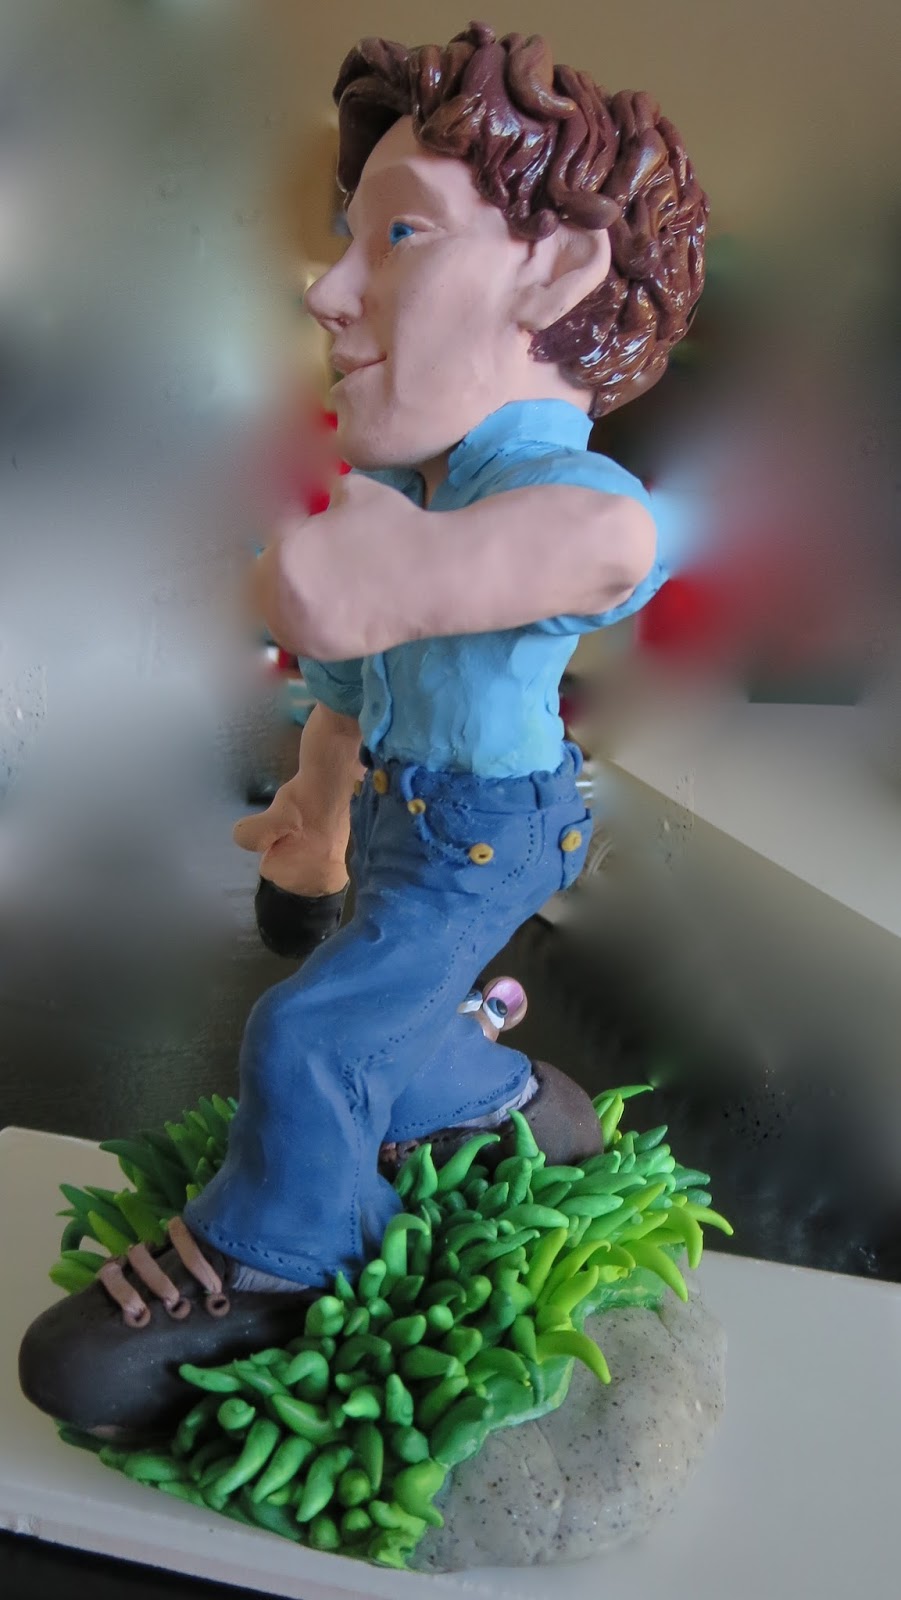
A representation of my wonderful nephew Jesse, (remember it is my first time.)
Been a while... since posting anything about my latest creative endeavours so let me share a bit about where I am at, creatively speaking that is...
At the end of December 2014, I finally received an inexpensive package of Polymer Clay. After hanging out with my young friend Luke S. who has been creating polymer clay critters for years now, I finally decided I wanted to see if I could work the rather stiff clay. As a part of my disability, Spinal Muscular Atrophy, I have not the most strongest of muscles, all over that is. Arms and hands included. However, thanks to God, in spite of no longer being able to use my other limbs and such, I have always been able to use my hands. I can use them even though I can't lift my arms or move them away from the central area of my body (my core muscles).
Well, thanks to the inspiration young Master Luke provided, I thought why not try. Able to find sample packs of this polymer clay on ebay.ca, I was able to test it out. Needless to say, was I excited to discover, that I could manipulate the clay and create objects. At first it feels like  a stiff cold plastercine. You know what Wallace and Grommet are created with, using the Claymation process. However, the more I held it in my hands, the more it warmed up and became more easily pliable and workable. The rest is history...

What is Polymer clay?
Polymer clay, contains polymers, or a plastic formula, that requires curing or hardening it by essentially "firing" it, in a low temperature oven. The clay I use, requires the temperature to be 275
Fahrenheit, 30 minutes for each quarter inch of thickness. Definitely read the package directions. The baking process is critical to cook out, or set the polymers, in order for creations to become sold, firm and ready to use in other crafts or ready to look at and enjoy, like my first ever human figurine. That is what we are sharing today.
Since I have spent most of my life creating handmade cards for special occasions, I consider this clay figurine, a three dimensional special occasion, "card" or greeting. Wanting to document the stages of creating the first time, ever life like, (supposed to be life like that is) figure of a young man I love deeply, my nephew Jesse... I will show you how what started out as, not so great looking to - whoa, not so bad. If it isn't clear from the image, my nephew graduates university this year, and isn't big into attending ceremonies like that. Too bad, say I.
It can still be special. I assumed the best way to get the message across would be to include a graduation hat in the composition some where, along with a graduating field mouse, added for fun. So lets take a look at the stages of...Eeekk! what is that?... to what we see above. I must tell you, I was pleased with the final results, I learned a lot along the process and will apply what I learned, if there is ever another time. As a bonus, you might get a few pointers along the way.
Armature, Ready, Begin...
After the armature was created using tin foil and wire, wrapped and shaped into the basic head, with a torso, arms and legs. The polymer clay needs a skeletal system, kust like we do. Too bad wire and tinfoil wouldn't work in us! Well, there was a time when I had a 10 inch stainless steel rod holding up my spine...but I digress.
Sorry I didn't take the photos of the armature, but I think you gat the concept. Then I wrapped the conditioned scrap clay onto the form.
it paid to draw out the completed idea prior to starting the project. Once the basic first layer of clay, was on, I baked it for a bit,  to harden the surface so it would be easier to focus on the forming of his head and face,
The genesis of Poly Jesse. Copyright Anita Berglund May 2015 
To begin the building up of the figurine process, I mixed up some flesh tone coloured clay, using white, a bit of a red, a yellow and touches of greens, just until you get the flesh tone you are going for.

Colour selection and mixing Tips:
Note to anyone trying what I did, I strongly recommend to you and me, make sure you mix more than you think you will need. When you  mix custom colours like a flesh tone, it is tough to remix that identical hue again. Trust me on this, I used up every last spec of it and could have used some more. But, it worked out.
Also, I have learned that poly clay can darken a wee bit once baked. Keep that in mind when colour mixing and the selection of overall colours.
Face Off!
The total height of the finished figurine is about 7 inches. That means, the face and head are but a fraction of the entire piece. It may be a fraction of the overall size, but the face, my handsome nephew's face, was the most difficult part of the entire project. Remember, this was my first time ever building/sculpting a realistic figurine. Well, it was intended to be realistic. The face alone, took me about three solid days of work. As you will notice in the photos below, his face changes a lot. He went from looking like an extra terrestrial, to and old bald man with a large nose, to History's Ceasar and then finally, some resemblance of the Jesse we know and love. The eyes, were literally gouged out at least seven or eight different times. Just when I thought they were perfect...they weren't. Check out some of the stages. I don't have every transformation, but you'll get the idea.
"Face" 1- Copyright Anita Berglund May 2015
"Face" 2- Copyright Anita Berglund May 2015 
"Face" 3- Extra Terrestrial?  Copyright Anita Berglund May 2015
"Face" 4- Copyright Anita Berglund May 2015 
"Face" 5 is it Jean Luc Picard?- Copyright Anita Berglund May 2015
"Face" 6- Mr. Burnz?  Copyright Anita Berglund May 2015 


"Face" 7- Copyright Anita Berglund May 2015


It was at this stage of development, when I was beaming with pride because I thought, even though 
Jesse's face was far from resembling him at all,  just having a smooth face with features and part of a scalp with ears, wow, what an achievement. Well,  God has great ways of humbling us, especially me. Excited that my dear Dad popped by, I assumed he would see what I saw. Well, not quite...upon seeing the result of about three days work at this point, he grinned as he remarked  about about having my "model," available - glancing toward my beloved husband, Craig. You decide...My Husband (he's the human below on the right) ...


Then this picture of my beloved husband. He's the one in the background of course!
.. Part 2 to be continued.


Saturday, December 13, 2014

Needle-Less Knitting Using Your Fingers

http://dharmaflyer.blogspot.ca/2012/03/finger-knitting.html
Okay, we've covered knitting with a spool and your arms, and now it's time to learn about how we can knit with our fingers.
Years ago I thought I knew what finger knitting was all about because I thought a friend and I were doing it. Turns out, as I researched the whole needle-less knitting thing, we weren't finger knitting. It explains why our "finger knitting" never turned into anything more than a yarn chain. See this little hand to the right, from "Little Bird SOS?"? (No, I don't know whose hand it is, just click on the link in the caption to go see more.) As you can see, it turns out that finger knitting actually is knitting by using your fingers to hold the stitches and then looping the yarn with the fingers of your other hand. If you saw the article on "Spool Knitting," it appears to works out kind of like spool knitting except  on an open spool, one that lays flat instead of a continuous loop.
Again, I haven't had a chance to illustrate these knitting ideas (It can take anywhere from three to forty hours for me to complete an illustration) so I am sharing the links and photos of people who have done a great job teaching us about finger knitting already! Make sure you check out their pages if you want a closer look.
See What can you Knit With Your Fingers?
From RedTedArt.com
http://www.redtedart.com/2014/03/19/finger-knit/finger-knitting-for-kids-easy/
Above is a cute idea for a teddy bear scarf, maybe necklace in a lariat style. A Lariat is a type of necklace that has one end loop through another. And Below from RedTedArt. is another colourful idea. Use whatever colours you like and voila.


http://www.redtedart.com/2014/03/19/finger-knit/finger-knitting-for-kids-easy/
Finger knitting with beads and leather cording from a blog called "Corner Window!" Really unique and another great gift idea.
http://cornerwindowcrafts.blogspot.ca/2013/02/leather-lace-finger-knitting.html

And how about knitting with your fingers and lace! Here is a beautiful lace headband from "Living In Lilliput."

Remember to take a look at the website links and give knitting in any form a try. 
Now Watch "How To Finger Knit" Videos From Fiber Flux.
How To Finger Knit a Flower Headband by Audra Kurtz
Next Time…
All this talk about knitting without knitting needles, has given me the idea to share some sites and pictures on knitting with needles, something my Mom taught me to do when I was about seven. In my opinion, once you know how to knit the traditional way, then these "Needle-Less" methods seem far more cool!


Friday, December 12, 2014

Needle-Less Knitting With Your Hands!

http://premieryarnsblog.blogspot.dk/2014/03/couture-jazz-arm-knit-afghan.html
Never in a million years would I have ever thought of using your arms as knitting needles. Would you? Think about it, knitting needles may come in various thicknesses, but they are long, straight and usually made from steel, plastic or wood. As a kid I do remember trying to knit with pencils and that was challenging enough.
When my friend told me about how she and her ten year old son were making christmas gifts by arm knitting scarves, my jaw did kind of dropped..."How do you do that?" She explained it but I couldn't picture it until I Googled it and saw it for myself. It is something that I could never do because of my physical challenges, but if you can use your two arms together, then you can do it too!
Because I wanted to share these fun ways to knit without needles, I haven't had time to do my own illustrations so I borrowed some photos from others on the internet. Please check out their websites by clicking on the links in the photo captions. And watch below for a couple of great tutorials, take a look and give it a try!
http://hattiemylove.blogspot.ca/2013/03/finger-knitting-icord-and-arm-knitting.html

http://hattiemylove.blogspot.ca/2013/03/finger-knitting-icord-and-arm-knitting.html
Take A Look At How To Arm Knit!
How To Knit A Blanket WIth Your Arms!


Wednesday, December 10, 2014

Needle-less Knitting - Using A Spool!

http://www.buildingblockstoys.com/buy/0139769/cool-spool-knitting/
Do you know how to knit? Even if you don't, most of us know that in order to knit, we need knitting needles. My Mom taught me how to knit when I was about seven years old, along with my favourite thing at the time, crocheting.

A really cool thing happened around that age, when my Dad told me about how he knitted as a kid using a wooden thread spool and some nails. It was called "Spool Knitting." Better still, he made me a spool just like he use to use and taught me how to spool knit! It was so easy, I did it a lot and was able to make pot holders and mini spiral rugs.I thought I would share some easy ways anyone can knit without knitting needles, Spool Knitting being one of those ways. Because I just got the idea today, I haven't had a chance to work on some illustrations to show what I am talking about, but I will try to get some done. Until then, I did some research and posted some pictures and videos with their links so you can hopefully be inspired to try out some of these ideas.

In fact I was excited to see so many ideas and how to lessons on making much larger, easier to use spools out of things like toilet paper tubes and ice cream containers!
Enjoy...
Spool Ideas
You can purchase spool knitting spools or you can make your own like my dad did for me. Here are a few ideas from others on how to make spools, using different materials. Check out the links to their websites written in the photo caption.
I borrowed this picture off of the internet to show you what the old fashioned spool looked like to give you some idea.
http://www.craftypod.com/2007/02/28/spool-knitting-why-do-i-love-it-so/

Since modern day sewing thread spools are made of plastic, it can't be the kind we used with nails. But I found something better, you can make larger spools using toilet paper rolls and popsicle sicks or skewers. So cool!
Make Your Own Spool

From Craftsanity

A Plastic Container Spool "How To" from "Etcetorize"
http://etcetorize.blogspot.ca/2010/11/spool-knitting.html
This Spool is from Craftypod 
http://www.craftypod.com/2007/05/14/from-spool-knitting-to-loom-knitting/
Watch these great videos to show you how you can easily get started today! 
A Video From Craft Sanity on Spool Knitting

Watch this Video From the Frugal Crafter
Someone made a cool bracelet from a larger spool knitting project
Anyone knitting with their feet? Nothing surprises me anymore! I would love to hear from you if you have tried any of these yarn projects. Feel free to ask any questions or comments or if there is something you would like to see on HeArtfully Creating, let me know!
http://theyarnstore.blogspot.ca/2013/09/spool-knitting.html

Next time…more knitting without needles, 
Knitting with Your Arms!

Saturday, October 25, 2014

Friday, October 24, 2014

Jewelry Making Basics: Let's Make Beaded Barrette Part #2


Above is a simple tutorial video about making your own beaded barrette! 
HeArtfully Creating,

Anita

Jewelry Making Basics: Let's Make A Beaded Barrette Part 3

Below is a simple tutorial video about bead types and a hand drawn illustration by me, trying to explain jewelry terms and bead types.

HeArtfully Creating,
Anita

hand drawn original illustration by Anita Berglund