 |
| The clay nubs that the floral wire "bead pins" sit in from one side of the cake pan to the other. |
 |
| A cake pan makes a large baking rack. You can use the bottom to bake more items too, |
On Old Cake Pan & Scrap Clay:
If you look at the picture to the right, you can see the cake pan that I placed nubs or small balls of polymer clay across from each other. Make sure to mould the little balls of clay snugly to the cake pan lip or edge. Most of my baked clay nubs, actually slide side to side now like a rail. It just worked out that way.
Floral Stem Wire For "Bead Pins:"
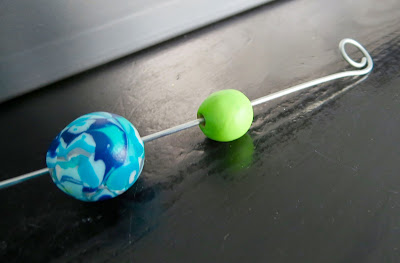
Then I cut up floral wire from 20 and 18 gauge floral wire, to the right length across the width of the cake pan. One long giant bead pin" I suppose. I do pre-pierce my beads with a needle tool first. Wire is too dull to make a neat hole. Then I slide my beads on. The picture below that is the floral wire 18 gauge, curled at the end with round nose pliers. Bamboo skewers work too. I would recommend using them for beginners, but know that the clay can stick to the bamboo so twist them a bit before baking.
The curled end helps to hold the strung beaded wire onto the polymer clay blobs or nubs. Now make sure you make a little slot to rest each end of the wire on. If you just push your wire ends into the raw clay nubs that you bake, it will bake, then harden and trap your wire and you won't get your wire free when your beads are done. You can see that my clay nubs were left with a wide indent. Make sure the indent is deep enough to hold your wire or skewer from rolling off.
 | |
|
I used this bead baking rack/cake pan a zillion times. Okay, A lot of times. When clay is baked at the right temperature, it can't burn when cooked repeatedly. Bonus, you can string of rows and rows of beads BEFORE baking your bead nubs. Just mould them all on, lay down all your loaded up bead pins/wires and push them down into the clay. Making sure you are NOT leaving them in a way that they will bake right into the wire holders.
Problem solving and working with what you can, saves money!
HeArtfully Creating!
I would love to hear your ideas, comments and questions below :o)

No comments:
Post a Comment